Saturday, October 27, 2012

In The Spotlight! Gluten-free Olive Rosemary Loaf From New Cascadia Traditional


Another Friendly Favorite!

This is one damn good hard loaf from New Cascadia Traditional, Portland's first gluten-free bakery. Soft, chewy center with juicy, whole black olives and hints of rosemary. Yummm. This bread is so good, it's hard to tell it's gluten-free.

New Cascadia only bakes their olive rosemary loaf on Tuesdays and Saturdays, and it's so good it practically flies off the shelves. They sell it at the Saturday Portland Farmer's Market, at New Seasons Markets, and at their bakery/cafe on the corner of SE Market and 6th.

It stays soft for 2-3 days, which is really great for gluten-free bread. It's excellent with soups and salads, dipped in olive oil, and served with cheese (goat and sheep for me.) It's a crowd pleaser at parties, even for gluten eaters.

I'm sorry that my readers living outside the Portland area can't also enjoy this product. But you will know where to go when you come for a visit.

For a complete list of the purveyors who sell New Cascadia's baked goods, click here.


Like Eating Friendly

Eating Friendly Twitter

Tuesday, October 23, 2012

In The Spotlight: Harvester Gluten-Free Pale Ale


Another Friendly Favorite! Enjoy a pint of crisp, bitter/sweet, well balanced pale ale from Harvester, Portland's only dedicated gluten-free brewing company.

Harvester is a relatively new, up and coming brewery. They can be a daringly experimental with their beers from time to time. For instance, I bought a bottle of their new IPA, and it was so bitter that I found it undrinkable. However, these guys are learning as they go, and in a few months, their IPA may be their best beer on the market.

But as far as their pale ale is concerned, they've got it figured out. It's consistently good and satisfyingly refreshing. Just remember to be careful when removing the cap. Some of them don't come off that easily.


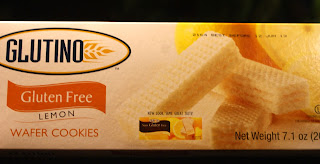
In The Spotlight: Glutino Gluten-free Lemon Wafers


Another Friendly Favorite! Glutino Gluten-free Lemon Wafers. Crispy, sweet, tart, delicate, lemony wafters as light as air. Mmmmmm. Need I say more?

My only complaint is that I eat way more than I should in one sitting. Their wafers also come in chocolate and chocolate vanilla. I can't eat them because they're made with dairy. Glutino makes good products, so I bet they're good.

They usually cost just under $5, but right now (October 23, 2012) they are on sale at New Seasons Market for $3.99.

Go get your wafer on.


Monday, October 22, 2012

Gluten-free, Dairy-free Pumpkin Pie Recipe


During the holiday seasons of years past, I spent hours in the kitchen experimenting with gluten- and dairy-free recipes and dreaming of my delicious first bites. Many times, the actual results were utter disappointments, and I would be the only one at holiday parties chewing through my embarrassingly semi-edible breads and desserts while everyone (including me) pretended not to notice how bummed out I actually was.

But times have changed, and pumpkin pie not only tastes good again, it's delicious!

My entry here is also a review of two products: Bavaria Mills Pre-made Gluten-Free Pie Crust (Pair) and Wholesome Sweeteners Organic Evaporated Cane Juice

The evaporated cane juice was grainy, so I mixed the sugar blend with the eggs before I put the pumpkin in, giving the cane juice time to dissolve.

The gluten-free pie shell from Bavaria Mills was okay. Its texture was great, but the bare crust's flavor was slightly bitter, dry, and lacking in salt. Simply put, it's a vehicle for your filling and nothing more. Overall, I give it a B, because it comes in handy when you're in a hurry. I would use it again. 


Gluten-free, Dairy-Free Pumpkin Pie Filling

(EDIT: if you want to use regular sugar, you can substitute it for the cane syrup crystals. The original recipe called for 1/2 C brown sugar and 1/4 C white sugar. I'm sensitive to white sugar, so I went looking for an alternative.)
   3/4 Cup Evaporated Cane Juice
    1/2 Teaspoon Sea salt
  1/2 Teaspoon Ground Ginger
   1/4 Teaspoon Ground Cloves
   1/4 Teaspoon Ground Nutmeg
   1 Teaspoon Ground Cinnamon
   2 Eggs
   1 Teaspoon Vanilla Extract
   1 15-oz Can Pumpkin Puree
   1 Cup Coconut Milk 

Needed: 1 Unbaked Pie Shell. 
Preheat your oven to 350ºF.
Combine the cane juice, sea salt, ginger, cloves, nutmeg and cinnamon in a small bowl. Beat eggs in a large bowl. Beat in the sugar mixture until cane juice dissolves. Add vanilla and pumpkin puree, and mix until smooth. Fold in the coconut milk, making sure it is evenly distributed. 
Pour the filling into the unbaked pie crust. Bake for about 60 minutes or until a butter knife comes out clean.
Allow the pie to cool on a wire rack for 2 hours. 
I recommend refrigerating it over night, to let the spices mingle. 


Bavaria Mills Unbaked Gluten-Free Pie Crust


(EDIT: I don't provide a gluten-free pie crust recipe here, but if you're looking for one and you need a recommendation, comment in the box below. Also, look for my upcoming apple pie recipe, in which I review a gluten-free pie crust mix. That one will come out before Thanksgiving.)


For those of you who can't enjoy soy-based whipped cream with your pumpkin pie, try vanilla flavored Enlightened Creme from Enlighten Your Palate. See my previous article about Enlightened Creme for images and details. For a list of retailers who carry Enlightened Creme, click here

Thursday, October 18, 2012

Friendly Spotlight! Food Should Taste Good Multigrain Tortilla Chips & Sonoma Golden Teff Wraps!

Ingredients: stone ground corn, (one or all of the following oils: sunflower, safflower, canola), brown rice flour, flax seeds, evaporated cane juice, oat fiber, sesame seeds, sunflower seeds, quinoa, soy flour, sea salt. 
This crispy little treat came into my possession in a GF snack pack put together by an airline. (Thank you progress!!) I love their subtle sweetness and lightness of salt. They are so good that my picky-about-allergy-friendly-food chef hubby went looking for them at the health food store the next day, and helped me polish off a bag in one sitting! If you're living in Portland, they are on sale for $2.99 at New Seasons right now! (October 18, 2012.) Their other chips are great, but these are by far the best product they make.

Ingredients: water, tapioca flour, whole grain ivory teff & millet,  expeller pressed canola oil, soy lecithin, cultured corn syrup solids, cellulose gum, maltodextrin, carrageenan, and less than 2% of the following: guar gum, sea salt, honey, aluminum free leavening powder.
If you haven't tried these wraps, you should. Pull them out of the bag, and they smell just like flour tortillas made from wheat, and they taste like them too! But they need to be warmed up to make them soft and flexible. They can be used to make wraps and burritos. I haven't tried to make enchiladas from them yet, but I should!


Today's snack: a veggie-melt wrap of crimini mushrooms, chard leaves, and fresh garlic simmered in olive oil, topped with my favorite goat gouda from holland and a sprinkle of cumin. The garlicky olive oil is all the sauce you need for a wrap like this. Just make sure you don't scorch your oil.


My favorite way to warm these tortillas is to throw them onto a hot burner. I have a glass, electric burner, but you can use a hot skillet instead. Don't use any oil or grease, or they'll turn out greasy and gross. Use tongs, and please don't burn yourselves.

As always, my friends. Be well, and enjoy Eating Friendly!

Eating Friendly's Facebook Page
Twitter Handle: @EatingFriendly

Wednesday, October 17, 2012

Introducing The Friendly Spotlight!

Gluten-free, vegan pumpkin whoopee pie from Back to Eden Bakery. A soft, sweet confection that will haunt you after it's gone. No kidding. And it's just in time for the holiday season.


Hey folks! Every day I enjoy great allergy-friendly products, like this melt-in-your-mouth delicious pumpkin whoopee pie from Back to Eden Bakery! Mmmmm. Can you smell the cinnamon and nutmeg?

This delicious whoopee pie is one of the many treats that make me think, "I really need to share this with my readers, without the pressure of writing an entire article on the company that makes it...and eating their line of products and gaining a bunch of weight!" :|

No fair, I already wrote an article on Back to Eden today, right? Okay, okay. But the whoopee pie is one of my Back to Eden Favorites! So this one gets an exclusive plug during the introduction of my new concept: The Friendly Spotlight! From time to time, when I have one of my favorite allergy-friendly products in hand, I will give it a brief mention, without writing a feature article about it.

Look for The Friendly Spotlight! here on Eating Friendly, and on my Facebook and Twitter pages!

As always, my friends. Be well, and enjoy Eating Friendly.

Update: Back To Eden Bakery Now Dedicated Gluten-Free!!


Hands down, Back to Eden is my favorite Portland area allergy-friendly bakery. Why? Because they make it so easy! (Click here to read my previous article about Back to Eden.)

Back to Eden is open seven days a week, from 9a.m. to 9 p.m. (Everyone else is closed on Sundays.) They are a vegan bakery, which means that dairy and egg-sensitive eaters aren't limited one or two choices.

And now they make Eating Friendly even easier!! Last week, they made the switch to dedicated, gluten-free!!


As a frequent diner at Back to Eden, I can tell you that their deserts are always consistent. And now that they are all gluten-free, there are more to choose from, including cookies, coffee breads, cakes, and chocolatey confections! My new favorite is the pumpkin whoopee pie. 

(By the way, the guy at the counter said there's a good chance that Back to Eden will sell single serving pumpkin pies for the holiday season.) 


The change to dedicated gluten-free has sparked an increase in the savory options, and not surprisingly, a rise in lunch sales. Here is a link to their lunch menu.

From left to right: garden salad, curried chicken salad, quinoa pilaf, curried chicken salad wrap, chickpea tuna salad wrap (surprisingly popular!), tomato and kale quiche, tomato and kale cashew tart (one of my absolute favorites!)

Corn and Potato Chowder
Today's soup was a light, yet creamy corn and potato chowder with prominent flavors of cumin and celery. The creamy base was made from cashews. I ate mine with a cheddar, apple, sage scone--a surprisingly moist, salty/sweet biscuit. The scone was light for being gluten-free, and yet it didn't crumble. The only disappointment was that the cheddar flavor just didn't come through. That's vegan cheese for you. It just doesn't make much of an impact.

A closer look at the scone.

Back to Eden is still serving soft-serve and the sundae bar, even though the rainy season is here. For something warmer, try Townshend's Tea or coffee with So Delicious Coconut Creamer.


Saturday, October 13, 2012

Gluten-Free Chicken Hot Pot Recipe


Hello eaters!

With the overwhelming introduction of new blogs and articles about eating gluten-free, I've been rethinking the concept of Eating Friendly. I still plan to review restaurants and bakeries, occasionally, but I've decided that you, my readers, will get more out of my articles if I create recipes using allergy friendly products, such as pizza crusts and cake recipes, and then share my findings with you here, on Eating Friendly. Here's my first recipe: Gluten-Free Chicken Hot Pot!

My GF Chicken Hot Pot has always been a crowd pleaser. It's a perfect recipe for adjusting amounts of certain ingredients, depending on your palate. And it's right on time for the chilly autumn season!

Gluten-Free Chicken Hot Pot:

Components:

Soup
Rice (or) 100% Buckwheat Soba Noodles (see below)
Avocado (optional)
Chopped green onions

Both versions (rice, soba) serve about 4

Ingredients for soup: 

2 inch ginger root
1 whole spicy pepper or chili (optional)
1 whole bay leaf
2-3 cloves raw garlic
2-4 green onions
Quartered Crimini (or) sliced Shitake mushrooms, about 1 cup (optional)
2-3 whole chicken legs, skin on
1 TBSP olive oil
Salt (to taste)
Water (about 2 cups)

Directions for soup:

To begin, salt both sides of your chicken legs and set aside.

Salting beforehand allows the salt to penetrate the meat. Otherwise it comes off in the pan the moment it hits the oil. 2 legs are enough, but 3 impart more flavor and provide more protein.

Cut your ginger lengthwise and peel your garlic cloves. Rinse and cut green onions in half. Set the greener, more delicate ends aside. Cut the tougher, whiter ends into 2-3 inch-long pieces and keep them with your ginger, bay leaf, and garlic. (The picture below will give you a good idea of how thick you want your ginger to be. You can use more or less ginger, depending on your preference for its flavor.)


In a soup pot, heat the olive oil until it's just beginning to ripple, but not smoke. Brown your whole chicken legs in the oil on both sides. (Below is a picture of the skin after it's been browned.)


After the chicken legs have been browned, fill your pot with just enough water to cover your chicken, and then add your ginger, garlic, bay leaf, pepper, and the "white sides" of your green onions. Salt your water with one or two pinches of salt (or to taste.) Cover and bring the temperature up to a steady simmer, and then turn down the heat to mid-low or low, depending on your stovetop's power. (You want it to be simmering lightly, but not overflowing and not boiling.)

(You can also add mushrooms to the broth about half way through the cooking process. My favorites for this recipe are shitake and crimini. If you forget to add your mushrooms half way through, you can cook them in the broth while the meat cools (see below.)

You just want to cover the chicken with water, and then add your flavoring components: ginger, pepper, bay, green onion, garlic. Then cover with a lid and let simmer.)

Let simmer for about 30 minutes. After 30 minutes, cut into the chicken to see if it's cooked through. If it isn't cooked through, then let it go for another 10 - 15 minutes.

If the chicken legs are cooked through, turn off the soup, pull the chicken lets out, place them into a bowl, and let them cool. It's a good idea to separate the meat a little, so it cools down faster.

(If you want to put this over rice, now is the time to cook your rice (see below.) This is also where you want to cook your mushrooms if you forgot to add them halfway through the cooking process. If you slice them thin enough, you just need to add them to the hot broth, and they will cook without the need to turn the burner back on.)

After the meat has cooled, pull it off the bone into bite sized chunks, and then replace the pieces in the broth. Remove your pepper from the broth. (I leave the bay leaf and ginger in and let them continue to impart their flavors.)

Directions for Rice:

1 cup sticky rice
1 1/2 cups of water (salted)

Heat water to a boil. Add rice. Turn heat to low. Stir rice. Cover and let simmer for 18 minutes.
Turn off, stir rice.
Serve soup over rice.
Garnish with sliced avocado and sliced green onions.

Serves about 4.

100% Buckwheat Soba Noodles:

I buy these buckwheat soba noodles at New Seasons Market, a healthy grocer located in Portland, Oregon. They are made in Japan, so it's possible that they are made at a facility that also processes gluten containing products, so celiacs and ultra sensitive eaters should either avoid this product, or check to see if it's 100% friendly, and then let us know in the comments box below ;)

The texture of the noodles should come out dense and slightly chewy, and they should impart a nutty, earthy flavor. I love this product, and it's more nutrient rich than white rice.

100% buckwheat soba noodles are tricky. Follow my directions exactly, and you should be successful in this cooking endeavor.

Directions for soba noodles:

1 pkg 100% Buckwheat Soba Noodles
Water
Pinch salt

Bring salted water to a boil in pot.
In a medium to large-sized bowl, add cold water and ice cubes. (This is called an ice bath. Keep the bowl of ice water in the sink, or keep it next to your cooking pot.)
Add a small amount of soba noodles (1/2 inch to 1 inch thick) to the boiling water, and immediately settle into water with tongs. Try to separate noodles without damaging them. Let boil for about five to eight minutes (the cooking time varies), and then pull one noodle out and pinch with fingernails. (You can also bite into it to see if it's to your liking.) If noodle is tender and breaks apart easily, immediately remove remaining noodles and put them into the bowl of ice water.

Keep cooking noodles this way until you have the desired amount.
You can remove cooked noodles from ice bath and place in bottoms of soup bowls while you wait for the remaining noodles to cook.
Serve soup over noodles.
Garnish with sliced avocado and sliced green onions.

Serves about 4, but if you're a hungry group, you should consider having another package of noodles on hand, just in case.


Things to know: The ginger is for seasoning. It is edible, but it's rather shocking if you get a big bite of it. That's why it's cooked in large slices. It's easy to see them and pull them out. The bay leaf should not be eaten, and if you like its flavor, you should put it in the leftover broth and let it continue to flavor your soup. The same goes with the ginger.

Feel free to add vegetables to this dish as you see fit. Leafy greens are a perfect addition, and they are so easy! All you have to do with chard, collard greens, or kale is slice the leaves and add them to the broth while the chicken is cooling. You don't need to turn the heat back on and simmer them more. The temperature of the soup should cook your tender greens without turning them into mush.

Let me know how you like this recipe, and if you would like to see more. And if you have any eureka moments, feel free to share in the comments box below!

As always, my friends. Be well, and enjoy Eating Friendly!